|
|
|
|
The objective of this session is to program a window (in MVC) that shows a drawing. We will build our first window step by step.
A window displays a visual presentation of an application, which is normally not part of the window itself. An application should be a subclass of class Model.
Model subclass: #GraphicalDemo
      instanceVariableNames: ''
      classVariableNames: ''
      poolDictionaries: ''
      category: 'MVC-FirstSteps'
Class GraphicalDemo is our application model. On the class side of this class we add the method "open":
open
     "GraphicalDemo open"
   | topView |
  topView := ColorSystemView new
              label: 'Drawing'.
  topView controller open.
This is already a working window. Evaluate GraphicalDemo open to try it. You see the title bar that you can move around. The window borders are only shown when you move the window.
Did it work? When you got a red Walkback window, you have most possibly put the method into the instance protocol of the class. open is a class method here (like new) and has to be put into the class protocol.
Remark: It is a good idea to add the statement that you use to open the window as a comment. This facilitates your work and later it helps the reader of your code to understand what he should do.
Remark: It is not strictly necessary to define the method open as class method - it is more a convention that was often followed in the days of Smalltalk-80.
Next we add a thin border line:
open
   "GraphicalDemo open"
     | topView |
  topView := ColorSystemView new
              label: 'Drawing'.
  topView borderWidth: 1.
  topView controller open.
The borders are now permanently shown and you can resize the window. The window still has no content.
Now we add a model to the topView. The model is an instance of GraphicalDemo.
We can write
model := GraphicalDemo new.
but in a class method of this class, we can as well write
model := self new.
(There is a difference between these statements that comes into play when we use inheritance. This is discussed much later.)
open
   "GraphicalDemo open"
      | topView model |
  model := self new.
  topView := ColorSystemView new
              label: 'Drawing'.
  topView model: model.
  topView borderWidth: 1.
  topView controller open.
Now the window has a content. This looks like magic, but it is not. The method #model: sets both the model of the view and a default background color.
A different way to set a background color is to write:
open
   "GraphicalDemo open"
     | topView model |
  model := self new.
  topView := ColorSystemView new
              label: 'Drawing'.
  topView model: model.
  topView backgroundColor: Color lightGray.
  topView borderWidth: 1.
  topView controller open.
Next, we add this method
initialExtent
     ^200 @ 200
to the instance protocol of GraphicalDemo and try our example again. The window is now opened with this extent.
The method intialExtent is also implemented in Object and in fact the method in Object is called whenever a model does not implement its own method to define the initial window extent.
Next we need a view that can be used to display a drawing. None of the views that are available does exactly what we need. We will therefore program our own view. DrawingDisplayView is a subclass of View
View subclass: #DrawingDisplayView
     instanceVariableNames: ''
     classVariableNames: ''
     poolDictionaries: ''
     category: 'MVC-FirstSteps'
In method GraphicalDemo class>>open we create an instance of the new view and add it as a subview to the topView:
open
   "GraphicalDemo open"
      | topView model drawing |
  model := self new.
  topView := ColorSystemView new
              label: 'Drawing'.
  topView model: model.
  topView borderWidth: 1.
  drawing := DrawingDisplayView new.
  drawing borderWidth: 1.
  topView addSubView: drawing.
  topView controller open.
When we open the window, we see that the window border is now two pixels wide. In fact these are two borders: a one-pixel border of the top view and a one-pixel border of the DrawingDisplayView.
Note that the DrawingDisplayView does not implement drawing - currently it implements absolutely nothing. The drawing of the border is inherited from View and the white background is painted by the top view.
To see something, we add the method displayView to the instance protocol of DrawingDisplayView:
displayView

   Display fill: self insetDisplayBox
           rule: Form over
           fillColor: (Color h: 130 s: 0.5 v: 0.9)
The method insetDisplayBox returns the useable display rectangle of a view. Class Rectangle has a very useful protocol that should be studied in detail.
You can also do this:
displayView

   Display fill: (self insetDisplayBox insetBy: 10)
           rule: Form over
           fillColor: (Color h: 130 s: 0.5 v: 0.9)
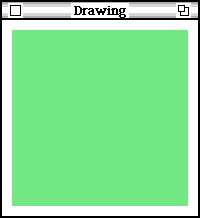
With this display method, our view displays a colored rectangle that does not cover the entire drawing area of the view:
Here we send the message insetBy: 10 to the inset display box to create a smaller rectangle. Let us look at the definition of the method insetBy:. You find it on the instance side of class Rectangle. Here it is:
insetBy: delta
  "Answer a Rectangle that is inset from the receiver by delta.
      delta is a Rectangle, Point, or scalar."

 (delta isKindOf: Rectangle)
  ifTrue: [^Rectangle
               origin: origin + delta origin
               corner: corner - delta corner]
  ifFalse: [^Rectangle
               origin: origin + delta
               corner: corner - delta]
First we see, that a new rectangle is created. (The message receiver is left unmodified, which has many advantages.) Then we see that delta can be either a Rectangle or an entity that can be added to or subtracted from a point. (The instance variables origin, corner are points).
Well, I said that Rectangle has an interesting instance protocol.
All this is very simple, but we will soon see slightly more complicated things.
We have now two very different ways to continue.
We will examine both possibilities.
First we let the view do all the drawing and we add a menu. We want to be able to change the color of the rectangle with a menu.
When we want to select the color, the instance of DrawingDisplayView needs to store our selection. We need an instance variable, and we change the class definition to introduce one:
View subclass: #DrawingDisplayView
     instanceVariableNames: 'displayColor '
     classVariableNames: ''
     poolDictionaries: ''
     category: 'MVC-FirstSteps'
On the instance side of DrawingDisplayView we add a method that defines the controller to be used:
defaultControllerClass
  ^MouseMenuController
When a controller is attached to a view, it processes all input that is directed to its view.
A MouseMenuController expects that the view implements the instance method getMenu:. (When you forget to define this method, you will get a debugger when you try to bring up the menu. That is not a problem at all, the debugger tells you that the view does not understand getMenu: and you conclude that you have to add this method.)
getMenu: aBoolean
   | menu |
  menu := CustomMenu new.
  menu add: 'yellow' target: self selector: #setColor: argument: (Color yellow);
       add: 'green'  target: self selector: #setColor: argument: (Color green);
       add: 'blue'   target: self selector: #setColor: argument: (Color blue);
       add: 'red'    target: self selector: #setColor: argument: (Color red);
       add: 'gray'   target: self selector: #setColor: argument: (Color lightGray).
 ^menu
In getMenu: we use a CustomMenu. This is a very flexible variant of a menu. The line
add: 'yellow' target: self selector: #setColor: argument: (Color yellow);
defines:
In our example, we always notify the view instance. All notifications are done with the same message setColor: and the distinctive information is the color itself.
A CustomMenu is an appropriate choice for a view that has the responsibility to implement the activities that are selected from its menu.
When the user selects a menu item, the message setColor: is used to send the selected color (the value following the keyword argument:) to the target, which is the view itself. In the instance protocol of the view, we have to provide this method definition:
setColor: aColor
  displayColor := aColor.
  self displayView.
Two things happen here
It is also possible to write:
setColor: aColor
  displayColor ~= aColor
    ifTrue:
      [displayColor := aColor.
       self displayView.].
The view is now only refreshed when the new color is not the same as the present color.
Finally we have to modify displayView to make use of the stored color:
displayView
   Display fill: (self insetDisplayBox insetBy: 10)
           rule: Form over
           fillColor: (displayColor ifNil: [Color h: 130 s: 0.5 v: 0.9])
Here we use Color h: 130 s: 0.5 v: 0.9 as a default when the instance variable does not reference a color value.
Now that we have a menu, we can use it to inspect what we have done so far.
getMenu: aBoolean
   | menu |
  menu := CustomMenu new.
  menu add: 'yellow' target: self selector: #setColor: argument: (Color yellow);
       add: 'green'  target: self selector: #setColor: argument: (Color green);
       add: 'blue'   target: self selector: #setColor: argument: (Color blue);
       add: 'red'    target: self selector: #setColor: argument: (Color red);
       add: 'gray'   target: self selector: #setColor: argument: (Color lightGray);
       addLine;
       add: 'inspect view'
            target: Inspector
            selector: #openOn:withEvalPane:
            argumentList: (Array with: self with: false);
       add: 'inspect top view'
            target: Inspector
            selector: #openOn:withEvalPane:
            argumentList: (Array with: self topView with: false).
 ^menu
The first added option opens an inspector on the DrawingDisplayView,
the second added option opens an inspector on the top window, which is
an instance of ColorSystemView.
Both options send the message openOn:withEvalPane: to the class
Inspector.
We are now in a position to do something beautiful:
In the class protocol of GraphicalDemo we add a method that creates a window with four subviews:
open4Views
   "GraphicalDemo open4Views"
    | topView model drawing1 drawing2 drawing3 drawing4 |
  model := self new.
  topView := ColorSystemView new
              label: 'Drawing'.
  topView model: model.
  topView borderWidth: 1.
  drawing1 := DrawingDisplayView new.
  drawing1 borderWidth: 1.
  drawing1 window: (0 @ 0 extent: 100 @ 100).
  topView addSubView: drawing1.

  drawing2 := DrawingDisplayView new.
  drawing2 borderWidth: 1.
  drawing2 window: (0 @ 0 extent: 100 @ 100).
  topView addSubView: drawing2 toRightOf: drawing1.

  drawing3 := DrawingDisplayView new.
  drawing3 borderWidth: 1.
  drawing3 window: (0 @ 0 extent: 100 @ 100).
  topView addSubView: drawing3 below: drawing1.

  drawing4 := DrawingDisplayView new.
  drawing4 borderWidth: 1.
  drawing4 window: (0 @ 0 extent: 100 @ 100).
  topView addSubView: drawing4 toRightOf: drawing3.

  topView controller open.
Note that every subview has a menu and stores its own color. Here we see for the first time the power of software construction with objects.

In the next section we discuss a different solution where the model has the responsibility to draw the diagram.
Additional stuff:
We can put our first drawing exercise into the method displayView: (Try it, it is really nice!)
displayView
    " draw a polygon with colored vertices "
 | points radius centralAngle n pen boxWidth center |

  boxWidth := self insetDisplayBox width min: self insetDisplayBox height.
      "  min:  computes the smaller of two values "
  radius := boxWidth //2 - 16.
  center := self insetDisplayBox center.  " the midpoint of the rectangle"
  n := 11.
  centralAngle := 360.0/n.
  points := OrderedCollection new: n.
  0 to: n - 1 do:
      [:idx | | angle |
        angle := centralAngle * idx.
        points
         add: ((angle degreeSin @ angle degreeCos) * radius) rounded
                + center
      ].
  Display fill: self insetDisplayBox
          fillColor: Color white.
  pen := Pen new
       defaultNib: 2;
       color: (displayColor ifNil: [Color black]);
       place: points last.
  points do: [:pt | pen goto: pt].
  pen roundNib: 9.
  1 to: n do:
      [:idx | | angle pt |
        angle := centralAngle * (idx - 1).
        pt := points at: idx.
        pen color: (Color h: angle s: 0.5 v: 0.7).
        pen place: pt; goto: pt
      ].
When you try the example with this display method, you obtain this view:

Do you see that we use the smaller side of the inset display box to
compute
the radius of the polygon?
The center of the inset display box is used as center of the polygon.
(again we make use of helpful messages in the Rectangle protocol!)
Do you see where we use the selectable color?
When you try this, do not forget to resize the window to see that the drawing is resized to fit into the window.
Exercise:
Add a menu item that brings up a second menu where you can select the number of vertex points in the range 3 .. 20. You will need a second instance variable to store this number. Use 5 as a default value when no number was selected.
The attached change set contains the example. GraphicalDemo1.cs (without the solution of the exercise. That will come later)
|
|
|
|